Introduction
In sewing, the seams you choose are just as important as the fabric, pattern, or tools you use. Different Nahttypen determine how strong, flexible, comfortable, and professional your final project will be. A poorly chosen seam can cause fabric to tear, stretch out, or look unfinished, while the correct seam can make even a simple project look expertly made.
Whether you are a beginner learning basic sewing skills or an experienced hobbyist looking to improve your techniques, understanding seam types is essential. This guide explores the most important seam types, explains when to use them, and provides practical tips to help you achieve clean and durable sewing results.
Why Seam Types Matter in Sewing
Seams are the structural foundation of any sewing project. They hold pieces of fabric together, distribute tension, and Nahttypen affect how a garment moves and feels.
Choosing the right seam helps you:
-
Increase the durability of your clothing
-
Prevent fabric fraying
-
Improve comfort and flexibility
-
Create a professional interior finish
-
Extend the lifespan of your projects
Without understanding seam types, even well-designed garments may fail after only a few uses.
How Choosing the Right Nahttypen Saves Time and Improves Quality
Selecting the appropriate Nahttypen at the beginning of a sewing project can save a significant amount of time and effort later. Many sewing problems, such as torn seams, stretched fabric, or uneven finishes, occur simply because the wrong seam was used. By matching the seam type to the fabric and the purpose of the garment, you reduce the need for repairs and adjustments.
Strong seams provide stability in high-stress areas like shoulders or side seams, while flexible seams allow knit fabrics to stretch naturally. Making thoughtful seam choices early in the process leads to smoother construction and fewer mistakes.
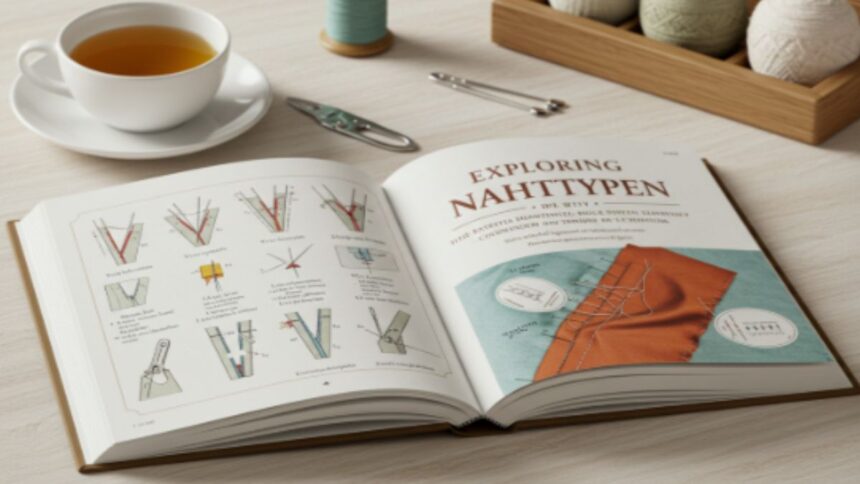
The Most Common Seam Types Explained
1. Straight Seam (Geradstichnaht)
The straight seam is Nahttypen the most basic seam and the first one every beginner learns. It uses a simple straight stitch to connect two fabric pieces.
Best for:
-
Woven fabrics
-
Simple garments
-
Repairs and beginner projects
Although basic, this seam is extremely versatile and forms the Nahttypen foundation for many other techniques.
2. Zigzag Seam
The zigzag seam creates a back-and-forth stitch pattern that allows the fabric to stretch.
Best for:
-
Stretch fabrics and knits
-
Reinforcing edges
-
Preventing fraying
This seam is essential when sewing sportswear, T-shirts, or any garment that requires flexibility.
3. French Seam (Französische Naht)
French seams hide the raw edges of fabric inside the seam, producing a clean Nahttypen elegant interior finish.
Best for:
-
Delicate fabrics like silk or chiffon
-
Lightweight blouses and dresses
-
Professional-looking garments
This seam requires two stitching steps but delivers a refined result.
4. Flat-Felled Seam (Kappnaht)
The flat-felled seam is Nahttypen extremely durable and encloses fabric edges completely. It is often visible on the outside of garments as a decorative and functional element.
Best for:
-
Jeans and workwear
-
Shirts and Nahttypen uniforms
-
Projects needing high durability
Because of its strength, this seam is commonly used in industrial garment production.
5. Overlock Seam
The overlock seam is made using a serger machine that stitches, trims, Nahttypen finishes edges at the same time.
Best for:
-
Preventing fraying
-
Stretch fabrics
-
Professional garment finishing
While not required for home sewing, a serger can significantly improve the Nahttypen look and durability of your seams.
6. Bound Seam
In a bound seam, raw fabric edges are enclosed Nahttypen binding tape or fabric strips.
Best for:
-
Jackets and coats
-
Decorative finishes
-
Projects requiring strong edge protection
This seam adds both durability and visual appeal.
The Role of Nahttypen in Creating Professional-Looking Garments
The choice of Nahttypen plays a major role in determining whether a handmade garment looks amateur or professionally finished. Even when using high-quality fabric and a good pattern, poorly chosen seams can weaken the structure of the clothing and make it appear unfinished. Proper seam selection ensures that garments hold their shape, lie smoothly against the body, and maintain their form after repeated washing.
For example, enclosed seams protect delicate fabrics from fraying, while reinforced seams add strength in areas that experience constant movement. Paying attention to seam types allows you to create clothing that not only looks better but also lasts much longer.
How to Choose the Right Seam Type
Selecting the correct seam depends Nahttypen several important factors:
Fabric Type
Delicate fabrics require enclosed seams, while thick fabrics need stronger constructions.
Garment Function
Stretchy clothing requires flexible seams, while heavy garments need reinforced seams.
Desired Appearance
Some seams are invisible, while others Nahttypen ndecorative design features.
Sewing Equipment
Your available tools may influence which seam you choose.
By considering these factors, you can avoid frustration and produce higher-quality results.
Practical Tips for Better Seams
To improve your seam quality, follow these simple but effective tips:
-
Use the correct needle size for your fabric
-
Choose high-quality thread
-
Maintain consistent seam allowance
-
Press seams after stitching
-
Test stitches on scrap fabric first
These small habits make a huge difference in the professional appearance of your sewing.
Common Seam Mistakes to Avoid
Even experienced sewers sometimes make mistakes. Here are a few to watch for:
-
Using a straight stitch on stretchy fabric
-
Ignoring seam allowances
-
Not finishing raw edges
-
Skipping pressing steps
-
Choosing weak seams for heavy garments
Avoiding these errors helps ensure your projects last longer Nahttypen look better.
FAQs
What are Nahttypen?
Nahttypen are different methods used to join fabric pieces together in sewing.
Which seam is best for beginners?
The straight seam is the easiest Nahttypen most versatile seam for beginners to learn.
Do I need a serger to sew professional seams?
No, a regular sewing machine can produce most seam types, though a serger helps Nahttypen finishing edges.
Which seam works best for stretchy fabrics?
Zigzag or overlock seams allow stretch and Nahttypen prevent thread breakage.
Why should I press seams after sewing?
Pressing flattens stitches, improves appearance, Nahttypen makes garments look professionally finished.
Conclusion
Understanding different Nahttypen is one of the most valuable skills any sewer can develop. Each seam serves a specific purpose, from providing strength to improving flexibility or creating a refined finish. By learning how to select the right seam for each project, you improve both the durability and appearance of your work.
With practice, the process of choosing the Nahttypen best seam becomes intuitive, allowing you to sew more confidently and creatively. Mastering seam types not only enhances your technical skills but also opens the door to more advanced and professional sewing projects.